
3D Puff vs Flat Embroidery: Which Is Better for Caps?
Choose 3D puff or flat cap embroidery by comparing logo detail, cap structure, digitising, sampling and the finish your Malaysian team needs.
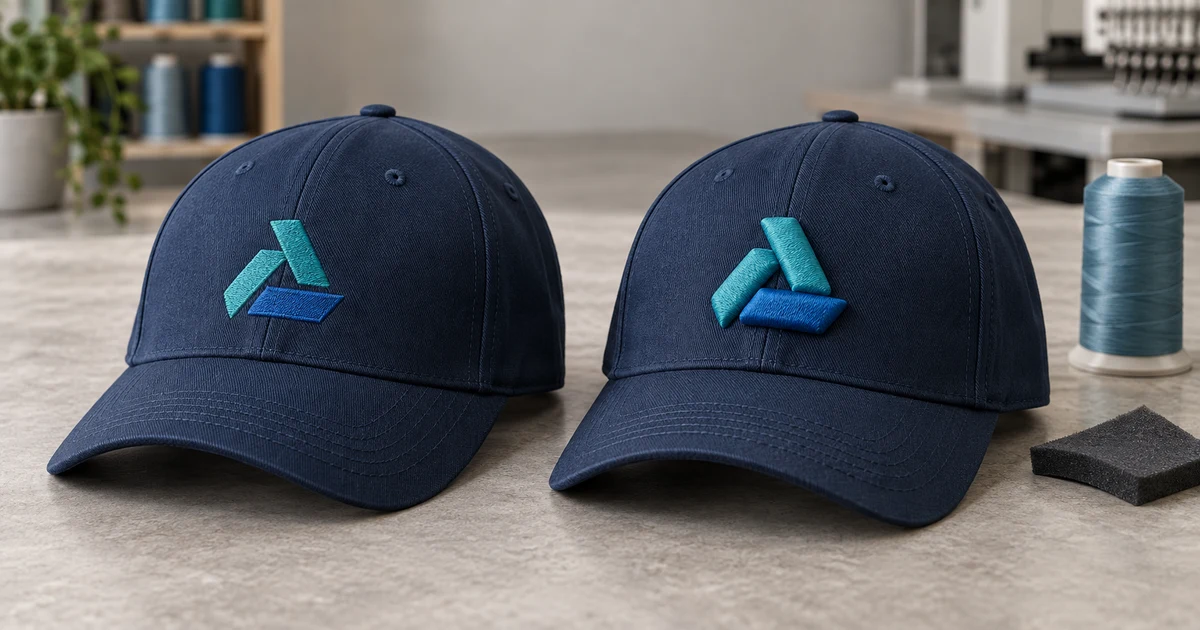
The short answer: choose 3D puff embroidery when a bold, simple part of the cap logo should have a deliberately raised sports or streetwear look. Choose flat embroidery when the logo depends on small text, fine detail, several narrow shapes or a lower-profile corporate finish. Approve the exact design on the exact cap; a normal flat stitch file should not be assumed to work with foam.
The choice is not about one method being universally more premium. It is about whether the logo artwork, cap construction and intended use support the extra height. A well-executed flat logo is better than a puff version with visible foam, soft corners or lost detail.
3D puff vs flat embroidery at a glance
| Decision point | Flat embroidery | 3D puff embroidery |
|---|---|---|
| Surface | Low-profile stitched surface | Foam-supported raised surface |
| Best starting artwork | Detailed logos, smaller elements and mixed stitch areas | Bold lettering and simple satin-column shapes |
| Digitising | Built for the garment, size and normal stitch construction | Built or adjusted specifically to cover and cut the foam |
| Garment choice | Suitable across a wider range when sampled correctly | Best starting point is a stable, accessible panel such as a structured cap |
| Main approval risks | Lost detail, puckering, poor registration and density | Exposed foam, open ends, uneven height, soft detail and panel distortion |
| Visual role | Conventional company identity and detailed marks | One deliberate dimensional accent |
A hybrid logo can use flat embroidery for small information and puff for one bold symbol or word. Treat the two areas as separate production elements in the proof.
What makes 3D puff embroidery raised?
In foam-based 3D embroidery, the machine first prepares the relevant area, foam is placed over it, and dense stitches perforate and cover the foam. Excess material is removed after sewing. Wilcom’s current 3D foam glossary describes that basic construction.
Madeira’s current 3D embroidery guide explains that satin-column elements are more effective starting candidates than fill areas. It also calls for specific digitising decisions such as an outline, sufficient coverage and capped ends where normal stitches would leave the foam open.
This is different from puff printing, where an ink system expands during curing. If your brief only says “puff logo”, identify whether you mean raised embroidery or raised print. The puff-printing guide covers the separate ink effect.
Choose puff when height is part of the identity
3D puff is most useful when the viewer should notice the physical depth. Good starting uses include:
- bold initials or block lettering on the front of a cap;
- a simple geometric brand symbol with broad, continuous strokes;
- one raised accent surrounded by flat embroidery; and
- a sports, club, merchandise or streetwear treatment where dimension is intentional.
Do not convert every colour area automatically. Foam can make a large logo feel heavier and may reduce the clarity of close internal spaces. Ask the digitiser to identify which elements can hold a clean raised edge at the requested size.
Madeira’s current 3D foam product guidance positions the technique for baseball caps and other stable fabrics, using designs prepared specifically for foam embroidery. That supports starting with a stable panel rather than assuming every soft T-shirt or lightweight knit is suitable.
Choose flat embroidery when detail and versatility matter more
Flat embroidery is normally the safer decision when the logo contains:
- small taglines or registration marks;
- thin strokes and tight counters inside letters;
- several small colour changes;
- detailed icons or irregular fill shapes;
- a restrained corporate appearance; or
- one identity that must translate across polos, woven shirts, caps and jackets.
Flat does not mean one stitch type or one production setting. The digitiser still plans running, satin and fill stitches, underlay, density, direction and sequence for the garment. The embroidery digitising guide explains why the source logo and machine file are not interchangeable.
If a supplier says fine detail is too small, do not add foam to rescue it. Enlarge, simplify or keep the affected element flat. Use the minimum text and line guide to review the final physical size.
Simplify only the part that needs puff
Ask for a marked artwork proof that labels every element as flat, 3D puff or not embroidered. This prevents a production team from guessing which blue shape should receive foam.
For a mixed construction:
- keep small text and detailed fills flat;
- use foam under one bold symbol or word;
- define the stitch order so flat areas do not interfere with the foam step;
- choose a foam colour close to the covering thread; and
- approve the combined result, not two unrelated swatches.
Madeira and Ricoma both advise using foam in a colour similar to the thread because exposed remnants become less conspicuous. That is a finishing control, not permission to accept visible gaps.
Select the exact cap before digitising
“Baseball cap” is not a complete garment specification. The front may be structured or soft, divided by a centre seam, shaped into several panels, backed differently, or interrupted by ventilation eyelets.
Oren Sport’s current Malaysian cap range lists cotton and polyester baseball caps, a trucker cap and other distinct product codes. This is useful evidence that buyers must identify the actual model rather than approve a logo on a generic cap mockup. Availability and suitability still need confirmation with the selected supplier.
Give the embroiderer:
- cap supplier, model code, material and colour;
- front-panel construction and any centre seam;
- final logo width, height and position;
- whether the mark crosses a seam;
- intended flat and puff elements; and
- size range or separate kids’ model, if applicable.
A logo approved on a flat fabric square is not approval on a curved cap. Likewise, a file made for a polo chest may need adjustment when moved to a structured front panel.
Quote digitising and sampling clearly
Puff normally changes both the stitch plan and the production sequence. Wilcom’s current 3D puff style guidance notes the need for considerations such as extra pull compensation, wider satin columns and, in some cases, capping stitches.
Ask the quotation to separate:
- cap cost by model and colour;
- digitising or adjustment for the exact puff construction;
- per-piece embroidery;
- special foam or materials if separately charged;
- one decorated production sample;
- revisions after the first sew-out;
- packing and delivery; and
- reuse terms for later orders.
There is no universal rule that puff must cost a fixed amount more. Design area, number of raised elements, stitch count, material, sample work and quantity vary by job. Compare the full approved scope instead of relying on a surcharge label.
Approve the front, side and worn view
A screen simulation cannot prove height or foam coverage. Request a final-size sample on the exact cap model and inspect:
- correct logo version, colours and position;
- clean coverage with no distracting foam showing;
- closed ends and recognisable corners;
- consistent height across the raised area;
- separation between flat and puff elements;
- alignment around the centre seam and panels;
- no unacceptable cap distortion; and
- appearance from the front, side and while worn.
Photograph the approved cap from those same views and keep the physical sample where practical. The wider sample approval checklist helps record the decision and later changes.
Keep the correct file and material record for reorders
Record which stitch-file version is the puff version. Keep the cap code and colour, finished dimensions, thread manufacturer and codes, foam colour and type, sample date, and named approver. Do not label a folder only “final logo” if it contains both flat and foam-specific files.
If the cap model, logo size, foam thickness or thread changes, ask the supplier whether a new sew-out is required. A previously approved effect should not be assumed to transfer unchanged to another cap construction.
For a comparable Malaysian quotation, send BajuPrintz the vector logo, marked flat/puff areas, cap model, colour, quantity, final dimensions and sample requirement. Request a BajuPrintz quotation after the construction and approval criteria are clear.
Frequently asked questions
What is the difference between 3D puff and flat embroidery?
Flat embroidery forms the design directly with stitches, while 3D puff places foam beneath specially digitised satin stitching to create a raised surface. Puff is a visual effect, not simply thicker normal embroidery.
Is every logo suitable for 3D puff embroidery?
No. Bold lettering and simple column-like shapes are better starting candidates. Tiny text, fine lines, sharp internal detail, gradients and large fill areas may need to remain flat, be enlarged or be simplified.
Can the same digitised file be used for flat and 3D puff embroidery?
Do not assume so. Puff normally needs a design prepared for foam coverage, including suitable stitch construction, extra compensation and covered endpoints. Ask whether the quotation includes a separate or adjusted puff file.
Can 3D puff embroidery be used on polo shirts?
It may be possible on a sufficiently stable garment and suitable design, but it is commonly associated with caps and other stable items. Approve a sample on the exact polo because foam height, dense stitching and fabric movement can affect comfort and appearance.
What sample should I approve for a 3D puff cap order?
Approve the final-size design on the exact cap code and colour, using the proposed thread, foam, backing and digitised file. Check the front and side profile, edges, corners, exposed foam, panel distortion, centre-seam alignment and appearance when worn.
Ready to compare suitable printers?
Get 5 Free Quotes